
March 31, 2026
5m 3s


The first use of the UART peripheral is often also its last: a meager printf("Hello World!\n") (I tend to prefer the more flavorful "Whazzup, Nate Jones?!") to ensure that the peripheral is working, or an unassuming printf("Here\n") to see if our code ever reached our beautiful function. I think this is a shame, because a serial port is so much more than just a way to use printf; it's a tiny portal into the heart of your microcontroller itself.
If we take a step back and consider what, exactly, a serial port is and what it's capable of, we'll find that it has uses in all manner of ways in the areas of
In Part 2, we began sending commands to the MCU (not just receiving logging and telemetry data) and using those commands to do neat things like control peripherals and read data, such as system status information. More broadly, though, we'd created a system where we could run any function or chunk of code we wanted on our MCU by simply sending <command> (plus any optional parameters) over UART. And there are a lot of interesting things one can do with a system like that when used creatively.
For instance, we'll see in this article how to not only control your MCU remotely but also how to develop Python for any MCU with a serial port!
In Part 1, I discussed how a small, internet-connected SBC (such as a Raspberry Pi Zero 2 W) and a VPN such as Tailscale can be used to read printf statements from anywhere in the world. Well, the sword cuts both ways! If we have a remote connection to our MCU, we can also send commands to it from anywhere in the world.
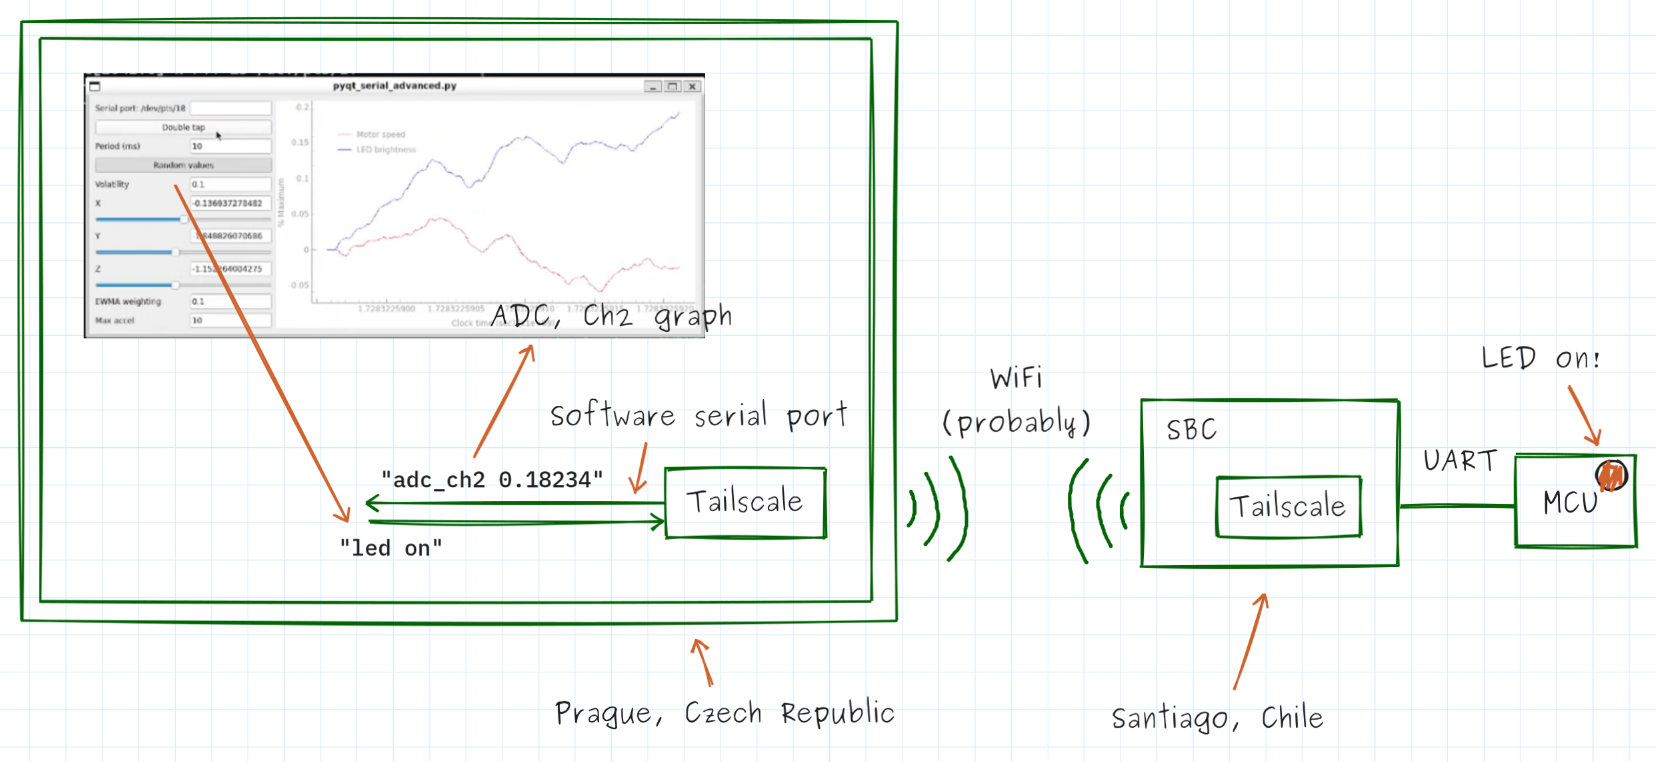
It's a real "remote control" for your MCU.
Speaking of control, you can also update your firmware over the UART port. (If you've established a remote connection to your MCU, then you could even perform this firmware update remotely.) Fundamentally, all you need is a way to:
1. trigger an update,
2. read bytes from the UART port until the entire firmware image has been received,
3. verify the received image, and then
4. write those bytes to flash.
The Optiboot bootloader in the Arduino MCUs works in exactly this manner. The Arduino IDE/avrdude triggers a reset using the USB-to-UART converter, and upon reset, Optiboot waits for a valid firmware image. One second after the last successful message, the bootloader triggers its own reset and jumps to the application.
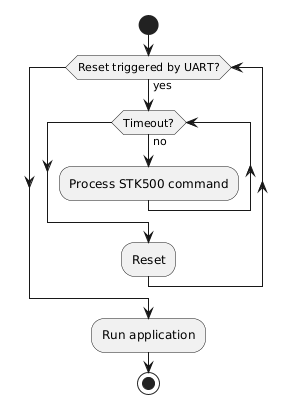
[CMD] [PAYLOAD (OPTIONAL)] [EOP (0x20)]
It implements a subset of the STK500 communication protocol, which you can read more about here. The STK500 protocol supports a number of commands, including "Program fuse bits", "Program flash memory", "Read data memory", "Read oscillator calibration byte", "Set parameter value", and more.
"Program flash memory", "Read data memory", "Read oscillator calibration byte", "Set parameter value", and more.
For comparison, here's an example of a simpler bootloader made for the STM32 (stm32-bootloader from GitHub user ferenc-nemeth).
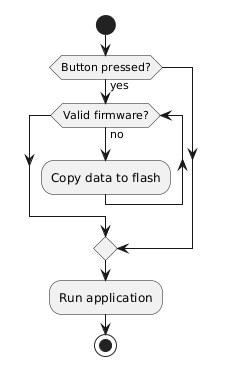
The flowcharts may look similar, but that's only because the overall structure of a bootloader is similar across implementations. The key difference between the two (which matters a lot for complexity and features) is that Optiboot supports a half-dozen commands (of the possible dozens that the STK500 protocol specifies), while stm32-bootloader basically only supports one.
The stm32-bootloader project uses the XMODEM protocol to send data to the MCU. XMODEM packets are composed of a start-of-header byte, a block number (1 byte), 255 minus the block number (1 byte), data (128 bytes), and a checksum (1 byte).
[SOH] [block#] [255-block#] [128 bytes data] [checksum]
⚠️ "Integrity", not integrity
Note that in this case the checksum provides integrity from accidental bit errors, not from an attacker sending a forged or malicious payload. In other words, a checksum is not a cryptographic integrity check. If you are concerned that an attacker could flash your device with their own firmware, you need to either disable firmware updates before production or add an authentication step to firmware validation.
Complete bootloaders also have to account for various exceptions and error conditions to avoid running garbled firmware or becoming "bricked."
Make sure that whatever bootloader you use (off-the-shelf, a modified open source project, or a custom one you write yourself) can handle these errors so that you avoid "bricking" your device.
Another application of the interface we've designed is in manufacturing, when you might want to confirm that a device is working, perform calibration procedures, or install security keys only after it's already been flashed and is about to leave the factory floor.
>> info
Part: STM32F411RE
UID: 1A002700...
Firmware: 1.7.3
>> selftest
GPIO: PASS
ADC: PASS
I2C: PASS
FLASH: PASS
RAM: PASS
>> calibrate adc
Offset: -3
Gain: 1.0021
>> config set key_material
Awaiting key material...
(Tester downloads encrypted file over serial interface)
Key material stored!
>> config save
If you've been thinking that all this UART stuff was just supposed to aid in development and would be compiled completely out of the production binary, then hopefully the idea that someone else might use your UART interface is both exciting and terrifying. Without an analysis of who should be allowed to do what and when, we may have significant vulnerabilities in our system.
Ideally, any feature that isn't needed by someone after production is completely compiled out of the production code. An attacker can't use it if it literally isn't there.
If someone does need a specific feature (such as a tester on the manufacturing line, like above), it's highly recommended that:
There's a lot more you could do with a "minimal HAL" than just control MCU peripherals from the command line. Say you had the following serial commands.
• Memory: rd, wr
• GPIO: config, dr, dw
• ADC: config, read
• etc
Let's wrap those commands in a Python library.
# machine.py
import serial
_ser = None
def init(port, baud=115200):
global _ser
_ser = serial.Serial(port, baud, timeout=1)
class Pin:
OUT = "out"
IN = "in"
def __init__(self, port, pin, mode, pull="none"):
self.port, self.pin = port, pin
_ser.write(f"config {port} {pin} {mode} {pull}\n".encode())
def high(self):
_ser.write(f"dw {self.port} {self.pin} 1\n".encode())
def low(self):
_ser.write(f"dw {self.port} {self.pin} 0\n".encode())
def value(self):
_ser.write(f"dr {self.port} {self.pin}\n".encode())
return int(_ser.readline())
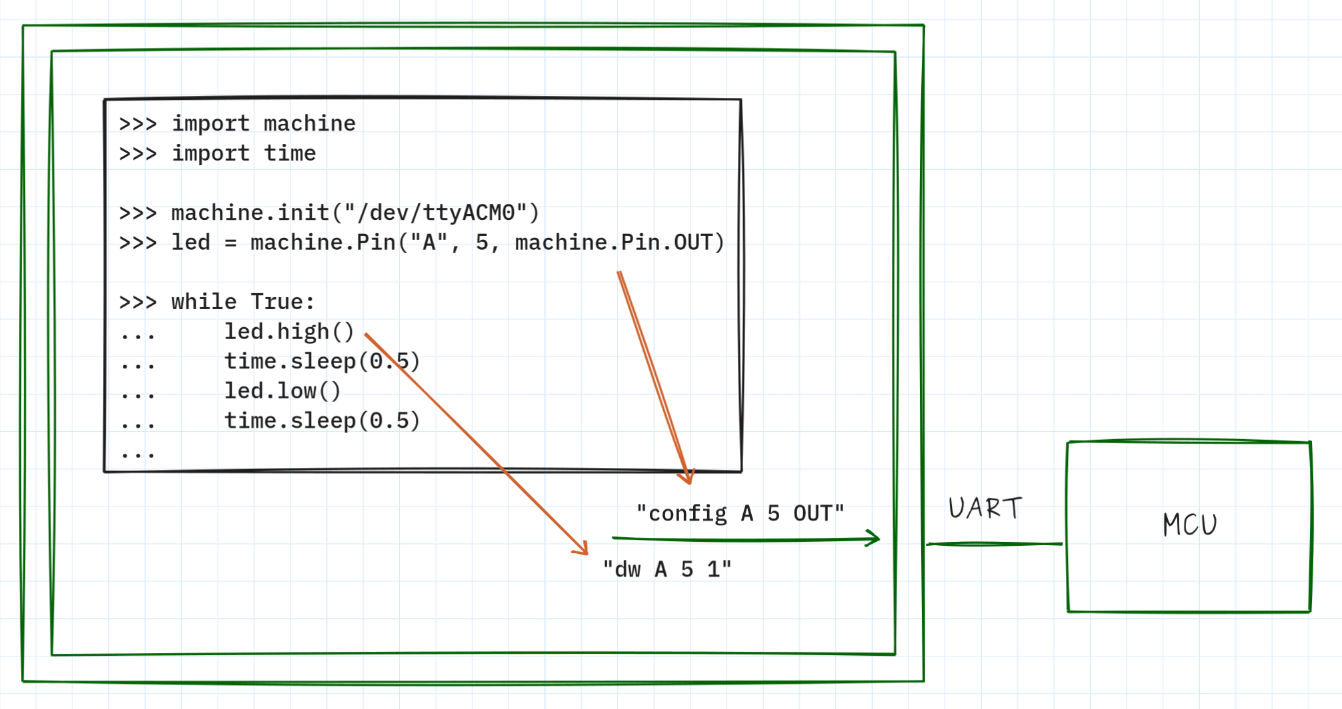
(The example above very intentionally tries to match the MicroPython API.)
Now we can start a Python session and "program" our MCU as if it were running MicroPython.
In value(), note that by reading the serial port immediately after writing to it, we're assuming the MCU isn't sending us any notifications; they're completely turned off. Otherwise, there would need to be a bit more machinery to ensure that value() got just the dr reply and not any notification messages.
🤔 What does the Python machine.Pin class in the code above _actually_ do?
A. It runs Python code directly on the MCU.
B. It implements GPIO access using the host's GPIO hardware.
C. It translates familiar Python method calls into serial commands understood by the MCU.
D. It replaces the MCU firmware.
Answer: C
Furthermore, you're not locked into Python for the remainder of the project with this method. Once you have a working Python task or driver, you can easily convert that code into C/C++ code that runs natively on the MCU. Code like the "blinky" task above may get converted into an application task that runs by default when the system starts up, while a driver or helper function like get_light_sensor_value() (see below) could be added to both the MCU command list and the Python class (not shown) to use it when developing the next MCU feature in Python.
uint16_t get_light_sensor_value(void);
void blinky(uint32_t ticks_ms);
void main(void)
{
while(1)
{
// UART parser. Command list includes:
// - "config <port> <pin> <mode> <pull>"
// - "dr <port> <pin>"
// - "dw <port> <pin>"
// - "light_val" <-- Reads ambient light value from I2C sensor and returns uint16_t
// by calling "get_light_sensor_value()"
blinky(get_ticks()); // Blinks LED at 1 Hz; non-blocking
}
}
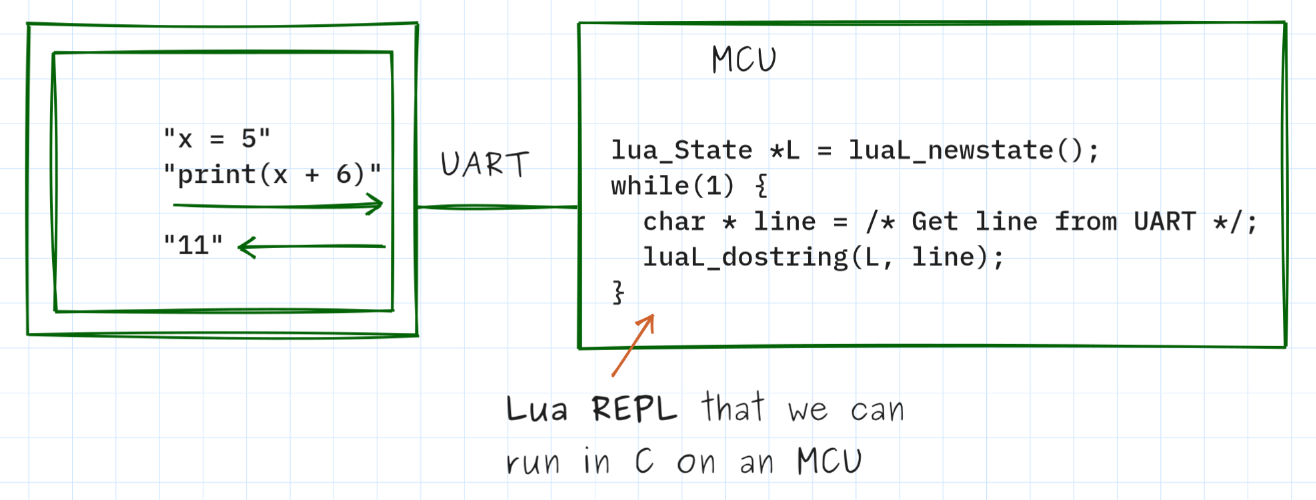
If you like high-level programming languages like Python, but want something small, fast, easily portable, and that actually runs on the MCU, I highly recommend looking at Lua.
Lua code looks and feels a lot like Python.
local function check_even_odd(number)
if number % 2 == 0 then
return "even"
else
return "odd"
end
end
local numbers = {10, 15, 22, 33, 40}
for index, value in ipairs(numbers) do
local result = check_even_odd(value)
print("Item " .. index .. ": The number " .. value .. " is " .. result .. ".")
end
--[[
Produces the following output
Item 1: The number 10 is even.
Item 2: The number 15 is odd.
Item 3: The number 22 is even.
Item 4: The number 33 is odd.
Item 5: The number 40 is even.
]]
Lua also has a ton of benefits for an embedded system. In my comparisons, Lua:
It's possible to get Lua running on a new MCU in a matter of minutes to hours. See my article and the Lua integration guide for more information.
🐍 Python vs 🔵 Lua
Fundamentally, what differentiates the last two examples: (1) using Python to send serial commands to the MCU vs (2) running a Lua interpreter on the MCU? Other than the bullets listed above, what might be their relative advantages and disadvantages? Which do you most want to try on your next project?
In Part 2 of this series, we learned how to write a simple CLI parser so that our MCU could respond to useful commands like read sensor or set motor_rpm 50. The power in this pattern came when we realized that what we'd done was make a system that mapped a <command> to a function to be executed on the device.
In this article, we've done nothing more than reuse an old technique from Part 1 to show how we could send those commands from around the world or use a <command> --> function mapping to perform extremely useful tasks, such as firmware updates or running higher-level languages like Python and Lua.
What else do you think you could do with a <command> --> function mapping on your MCU?
If you've made it this far, thanks for reading and happy hacking!
September 15, 2026
4m 57s
October 27, 2026
7m 20s